From time-to-time, you’ll need to update your modules, backup your store or even upgrade Magento. And if you’re online store is already live, then you’ll be required to briefly go into Maintenance Mode. Whilst in this mode, any visitors who try to visit your store will see this landing page. At a glance, it’s quite likely that your visitors will think that your website is broken and end up shopping somewhere else.
Developer Mode/Production Mode
It’s important to note that this tutorial assumes that you’re Magento 2 store is already running in Production Mode . Whilst in Developer Mode , you won’t be able to preview your changes so your page will look like this instead when Maintenance Mode is active (which is normal):

Chapter 1: Custom Maintenance Mode Introduction
As you can see, I have split my screen into 4 sections. We’ve got my web browser of choice (in this case Google Chrome), my SSH Client of choice (which is Putty for Windows – Available at Putty.org), a breakdown of Chapters to help you quickly navigate through the video. And finally any notes that I may find useful.
If you’re unfamiliar with Maintenance Mode, it can be activated to stop any unwanted visitors or admins from accessing the Frontend or Backend of your Magento 2 installation – Whilst allowing you to perform tasks like upgrading Magento, updating modules or backing up your store.
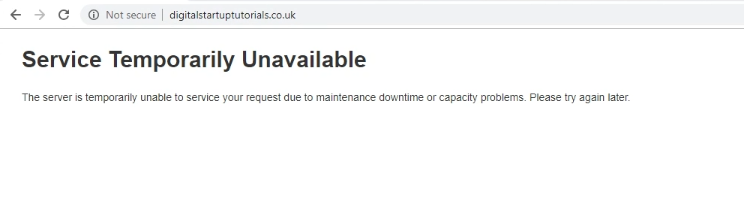
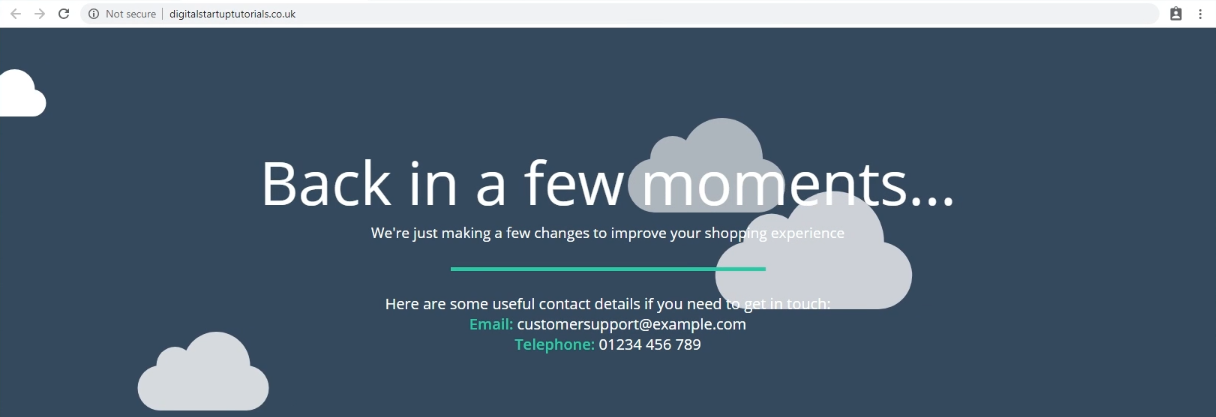
Right now, my sandbox store is in Maintenance Mode – And as you can see, it’s not a very pretty or professional looking notification. But by the end of the video, we’ll have turned it from this to this. It’s much more welcoming to the public and encourages your visitors to come back later – Rather than give up and shop somewhere else.
Chapter 2: Creating the new theme files
So, the first thing we need to do is make a copy or our default error templates and give the new folder a name. There’s a couple of ways you can do this, and I’ll show you both methods.
Method 1: FTP
The first method is over FTP. I’ve now got Filezilla opened in my main window. And I’m sitting in my Magento root folder. Now, I’ll navigate go into /pub/errors/. There we’ll see a folder called “ default ”. We simply grab that folder and download it to our computer like so. Then we rename the folder to something we can easily identify. For the sake of this example, I’ll call it “ fancyftp ”. Now, I just to re-upload that new folder back onto the server where I downloaded the original default folder. And as you can see, we now have the default folder and our new folder sitting side-by-side.
Method 2: SSH
The second method would actually be my preferred method, because there are less steps involved. As you can see in my SSH window, I’m already logged into my server as the magento user. This is the user who has native permissions to modify these files.
I’m already sitting in my Magento root folder. So, just like before I’m going to navigate to the /pub/errors/ folder by using:
cd pub/errors/
To ensure I’m where I need to be, typing ls -la will display the contents of the folder. Because I just did this already with the FTP method, you’ll see that here too. So, in order to copy the folder and rename it we don’t have to download it – We can literally just copy and rename it with one command. I’ll call this theme “ fancyssh ”. The following command allows me to copy recursively the folder called “default” and paste it in this location as “ fancyssh ”. (If you’re unfamiliar with “recursively” it means the folder and it’s contents):
cp -R default fancyssh
It’s that easy. To to verify that, we can type ls -la to list the contents of this folder. Or, because I still have Filezilla open, I can refresh the directory – And there you have it.
Chapter 3: Customising the new theme
DOWNLOAD THE THEME FILES FROM HERE
Now that the new theme files have been copied, it’s time to customise them to our liking. All of the theme files use HTML and CSS – So, if you’re capable of designing your own pages then now is your chance. However, this video isn’t about building web-pages 101. Instead, we want to replicate what I showed you at the beginning of this video. And there’s no easier way then simply downloading the files I already prepared for you…
So, I’ve gone ahead and downloaded the theme files from my article. Don’t forget, there’s a link to that article in the video description below. If I hit refresh in Filezilla, you will see a new directory called “ fancy ”. This directory is a copy of the default folder but with all of the modifications that make it look cool. Obviously, you can download these files and modify them however you see fit.
But out of respect for the creator where the original design was inspired – I’ve left a design credit as a hidden comment within the code.
As I don’t have any need to make any changes to these files, I’m simply going to drag the folder and upload it to my server. Easy.
Chapter 4: Enabling the new theme
Finally, we need to tell Magento which set of template files to use. To do this, we need a file called “ local.xml ”. Luckily, there is already a sample file in the error folder that we can use. Rather than rename it, I prefer to make a copy.
Method 1: FTP
We can do that the same way we created a copy of the default folder. Just drag and download the “local.xml.sample” file and rename it to “local.xml”. Then we just need to edit the file using your text editor of choice. Personally, I love to use something called Notepad++. With the file now open, I simply delete “default” and replace it with “fancy”. And whilst I’m at it, I like to change “print” to “email” for security. This feature is to ensure that if a visitor triggers an error, there is no chance that they will see the cause of the error – Which could be deemed a security risk. Instead, an email alert is sent to whichever email address you put in. So, I’d put in [email protected]. Which the changes now made, just save and upload the file.
To ensure the changes are now active, just go back to your Maintenance Mode page in your browser and hit refresh.
Method 2: SSH
Again, you can do this quickly using SSH instead of FTP. I’ll delete the file we just created and refresh the Maintenance Mode page so I can show you how.
The first thing you’ll need to do is create a copy of the “local.xml.sample” whilst renaming it to “local.xml” at the same time. Remember, we’re still in the errors directory on the server so just type:
cp local.xml.sample local.xml
Remember, we don’t need the “-R” this tim because we’re copying a file and not a folder. If I type ls -la now, you’ll see the new file we just created. So next, we can edit the file using the nano text editor. To do this we type:
nano local.xml
Now I just use a combination of the arrow keys on the keyboard to navigate my cursor and make the same amendments I did in the first method…
Once finished, press Ctrl+X to exit, and press Y and Enter to save your changes.
Now, if I go back to the Maintenance Mode page and hit refresh, we can see our changes.
Chapter 5: Conclusion
Don’t forget that all of the code that I used in this video can also be found in the article, so you can just go straight ahead and download it. Obviously, the page makes a great starting point for you to make your own. Just think carefully about the information that customers might need in a pinch, such as your contact details and opening times. Also, be sure to update your favicon and page title to keep with your current branding.
I hope you learned something new today and gained the confidence to try this yourself. And it you did then please hit the like button and subscribe if you haven’t already for more Magento tutorials.
Stuck of have questions?
In that case, simply reply below or start a new post