It’s not always obvious how pages have been created when looking at Demo Stores - Whether that be the Official or 3rd party Sample Data that you sometimes get with other themes.
To help you follow along, I’ll be going over a clean installation of Magento 2.3 with Sample Data installed on the Luma theme.
Homepage
The first example I’ll go through is the Homepage. Now, you’d assume that what you see here can simply be edited in the Content Page named “Home Page”… And I wouldn’t blame you for thinking that.
However, when you go there the page is blank. For all newcomers of Magento this can be quite confusing, but let me explain…
If I type “Hello” in the Content section and hit Save and go to the Home Page and hit refresh, you’ll see “Hello” but it will appear near the bottom. But why does it appear at the bottom and how do I edit the rest of the page? Great question.
Page Layouts and Containers
In order to answer that, I’ll quickly need to go over the basic concept of Page Layouts and Containers. Every page in Magento is broken down into 3 main sections: the Header, the Body and the Footer. But for this video, I’ll just be breaking down the Body.
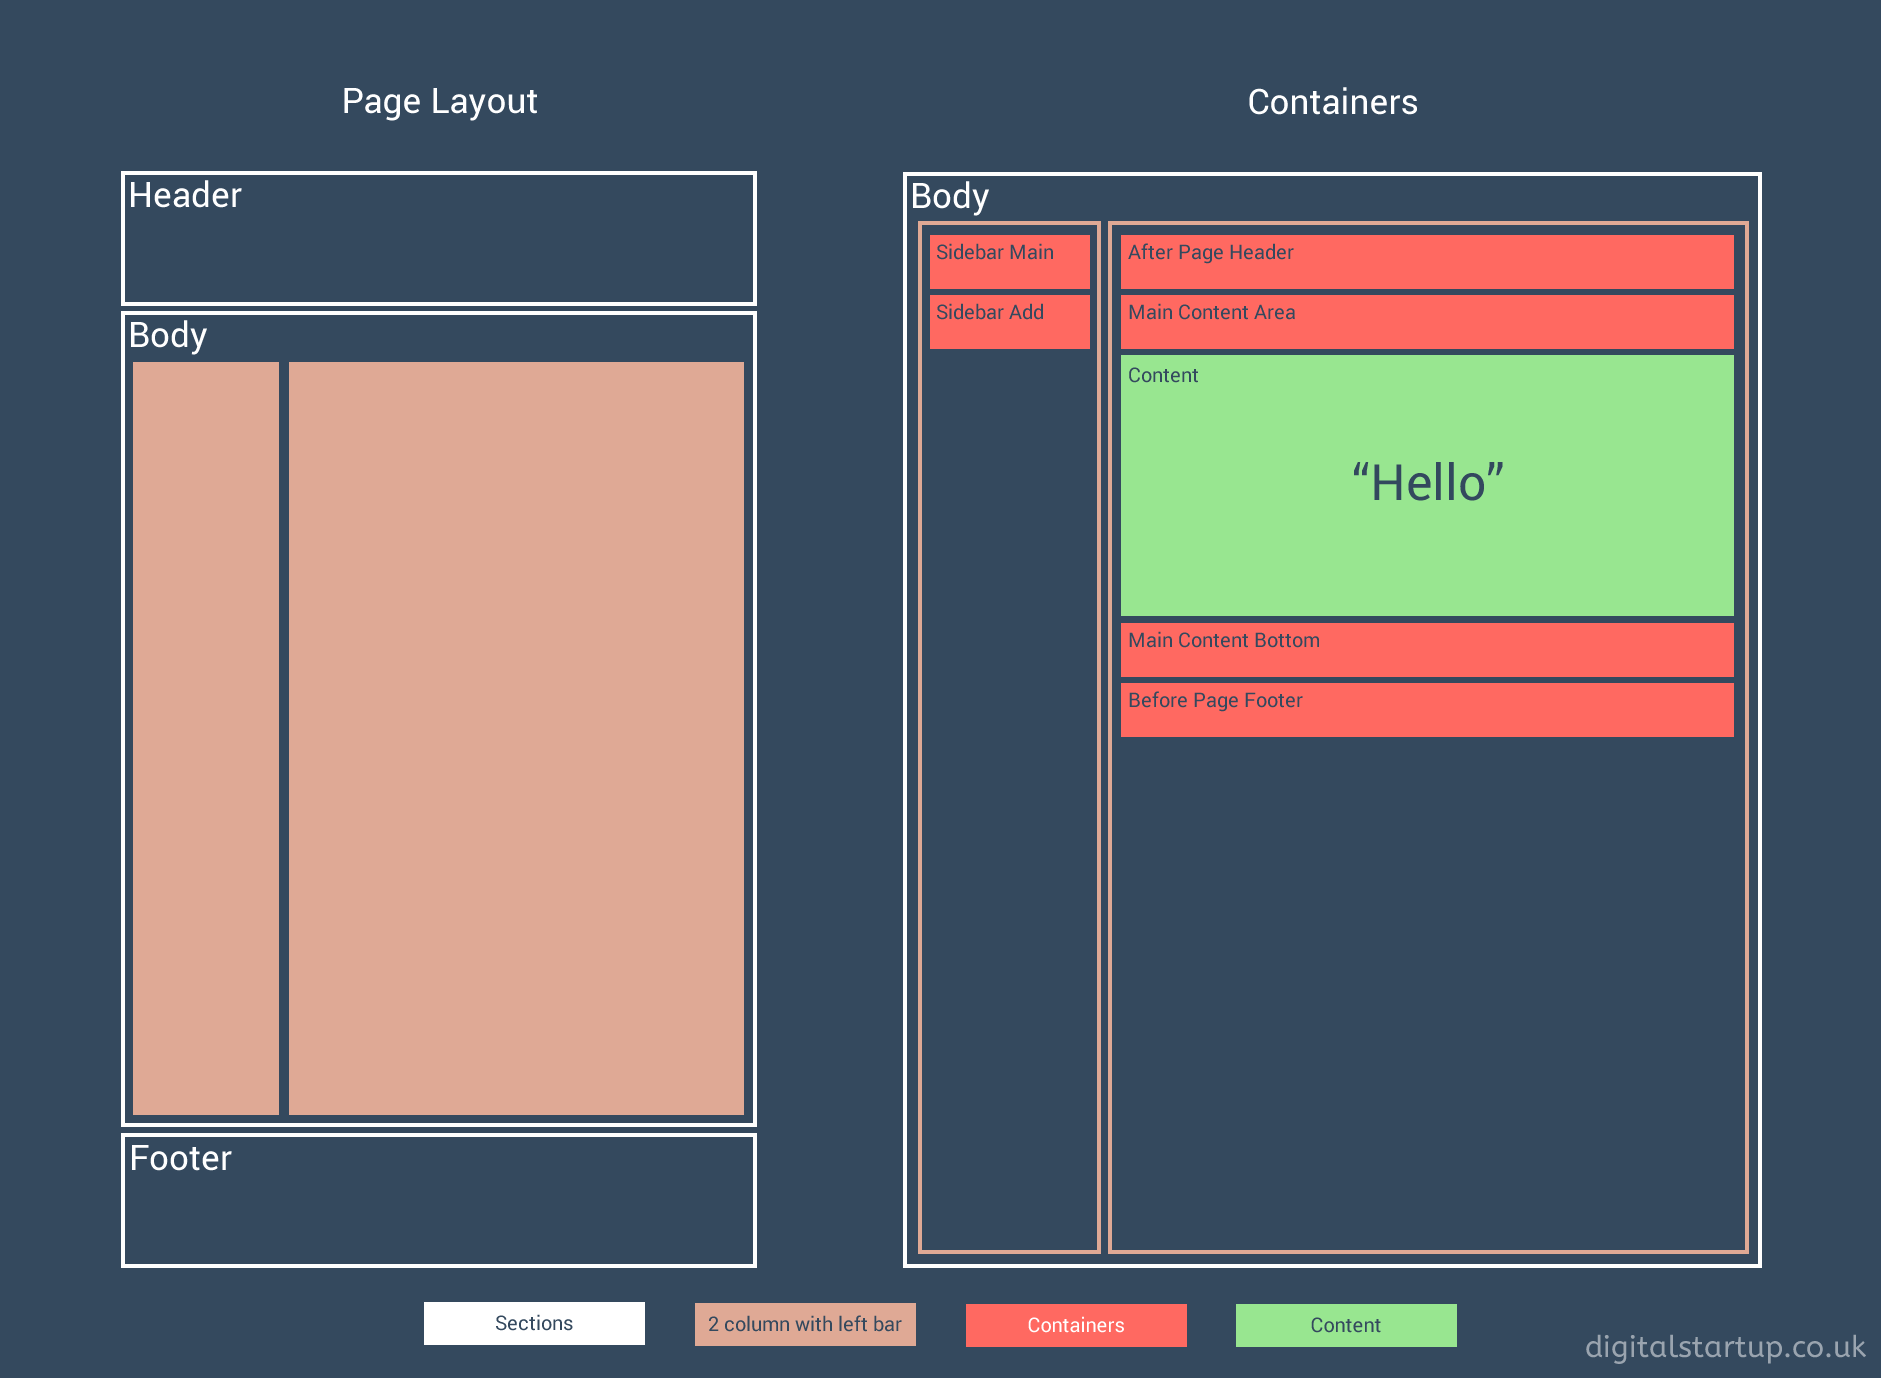
So, in this example you‘re looking at a “2 column with left bar” Page Layout - Clearly defined by the orange boxes. Within those boxes are a selection of pre-built Containers. I’ve highlighted some basic examples in red. The final box is for your content, which I’ve highlighted in green. This illustration is very over-simplified but hopefully, you’ll see where I’m going with this.
When I wrote Hello in my Content Page, it was saved to the Container that holds the Content. Everything else you see is sitting above in one of the other Containers.
Blocks and Widgets
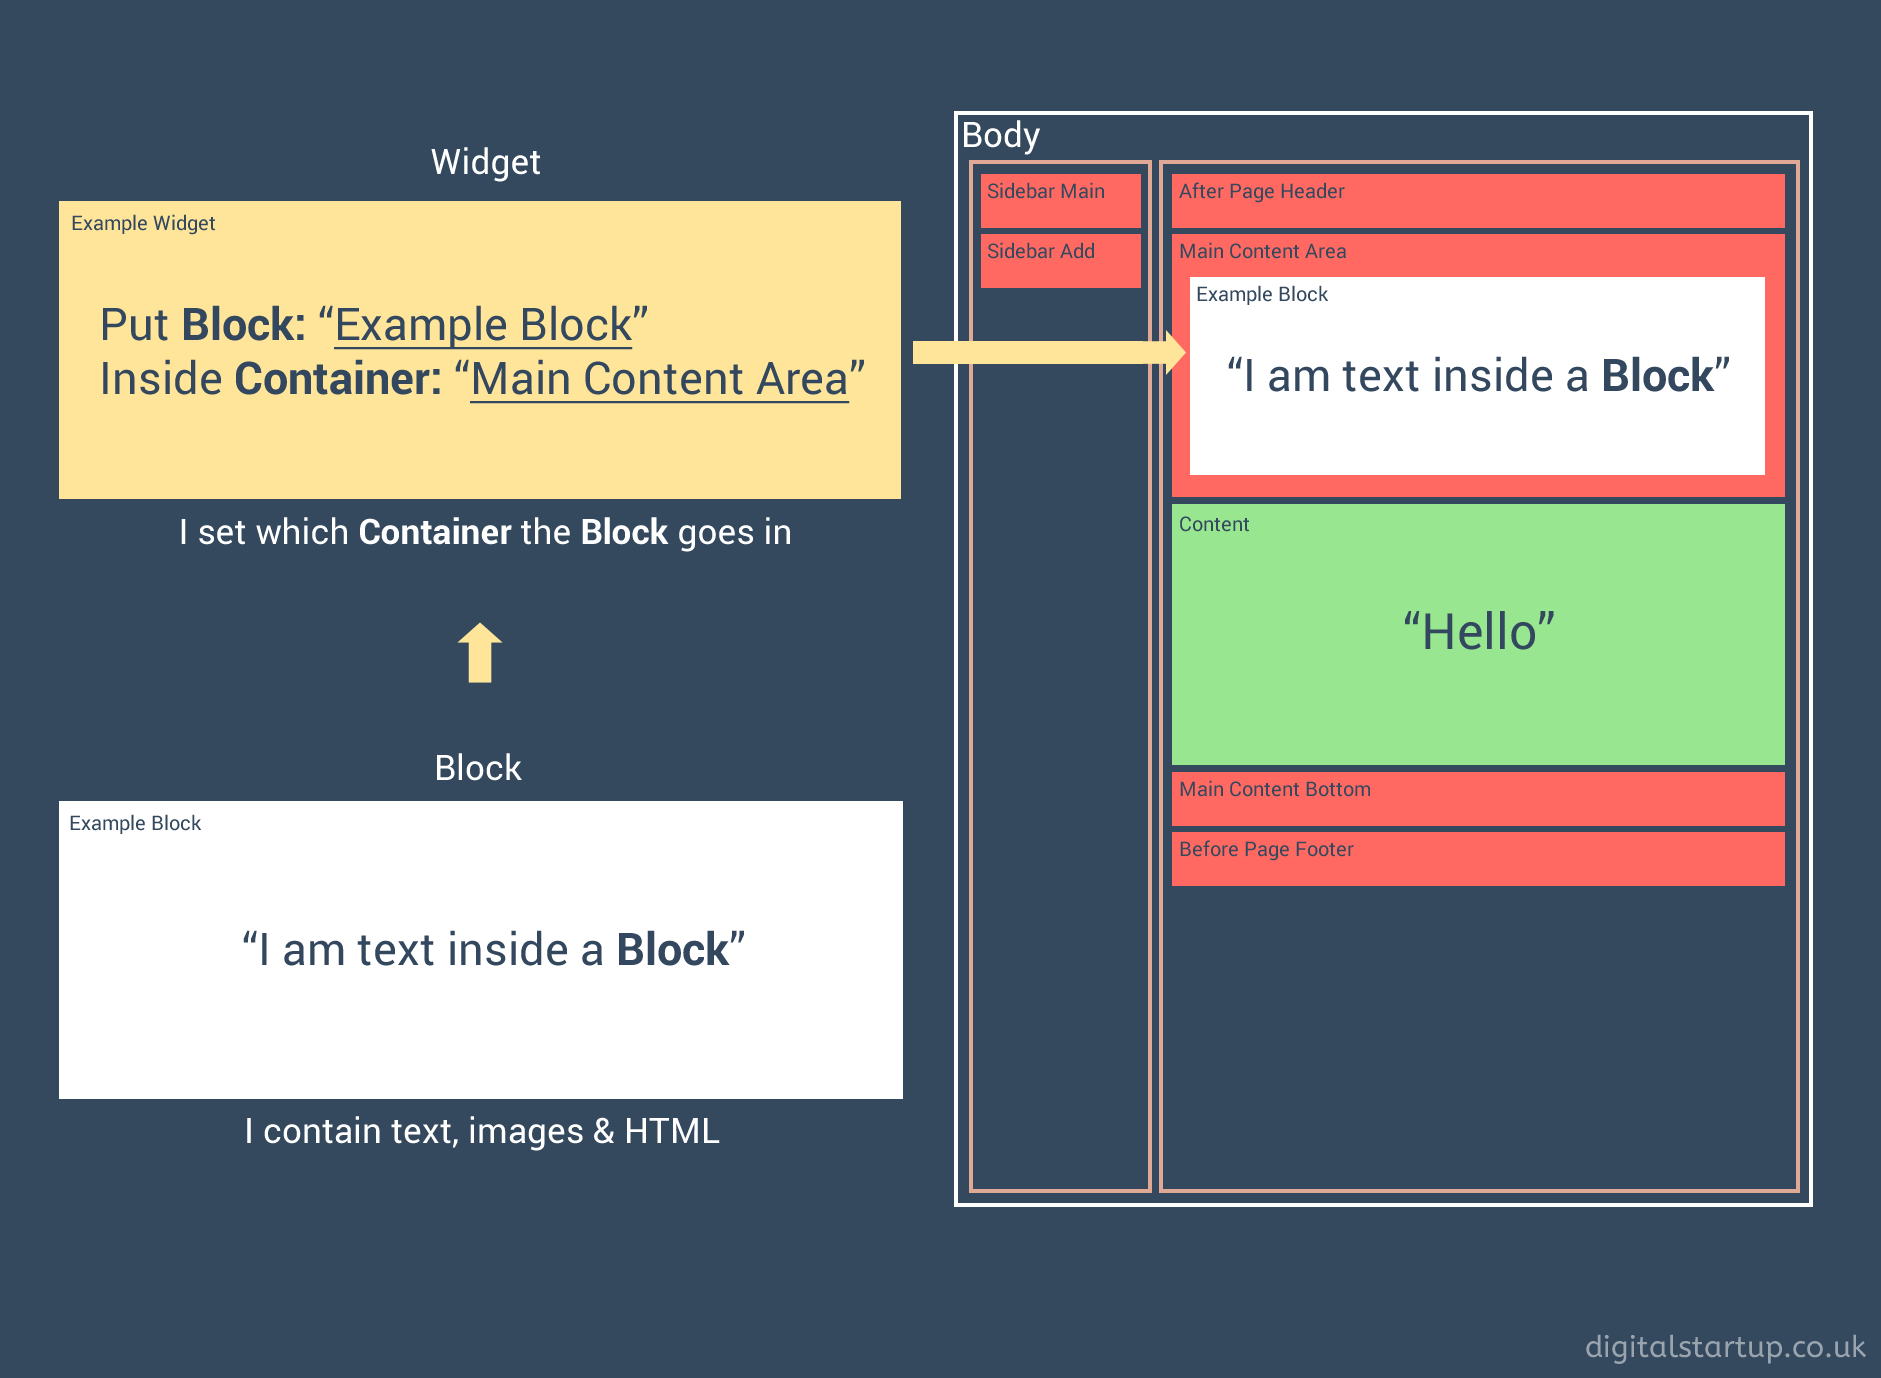
In order to add content to any of the other Containers, we rely on something called Blocks and Widgets. Simply put, a Block holds your content such as Text, Images or HTML. And a Widget controls which Container the Block goes in.
This concept of building pages isn’t unique to Magento, but I do understand why most people find something as simple as editing a page to be so confusing.
Why use Blocks and Widgets?
The most obvious thought you probably have right now is: Why use Blocks and Widgets? Why not just put the content straight on the page? Well, the point of Blocks and Widgets it to reduce repetition and quickly distribute content across multiple pages at the same time.
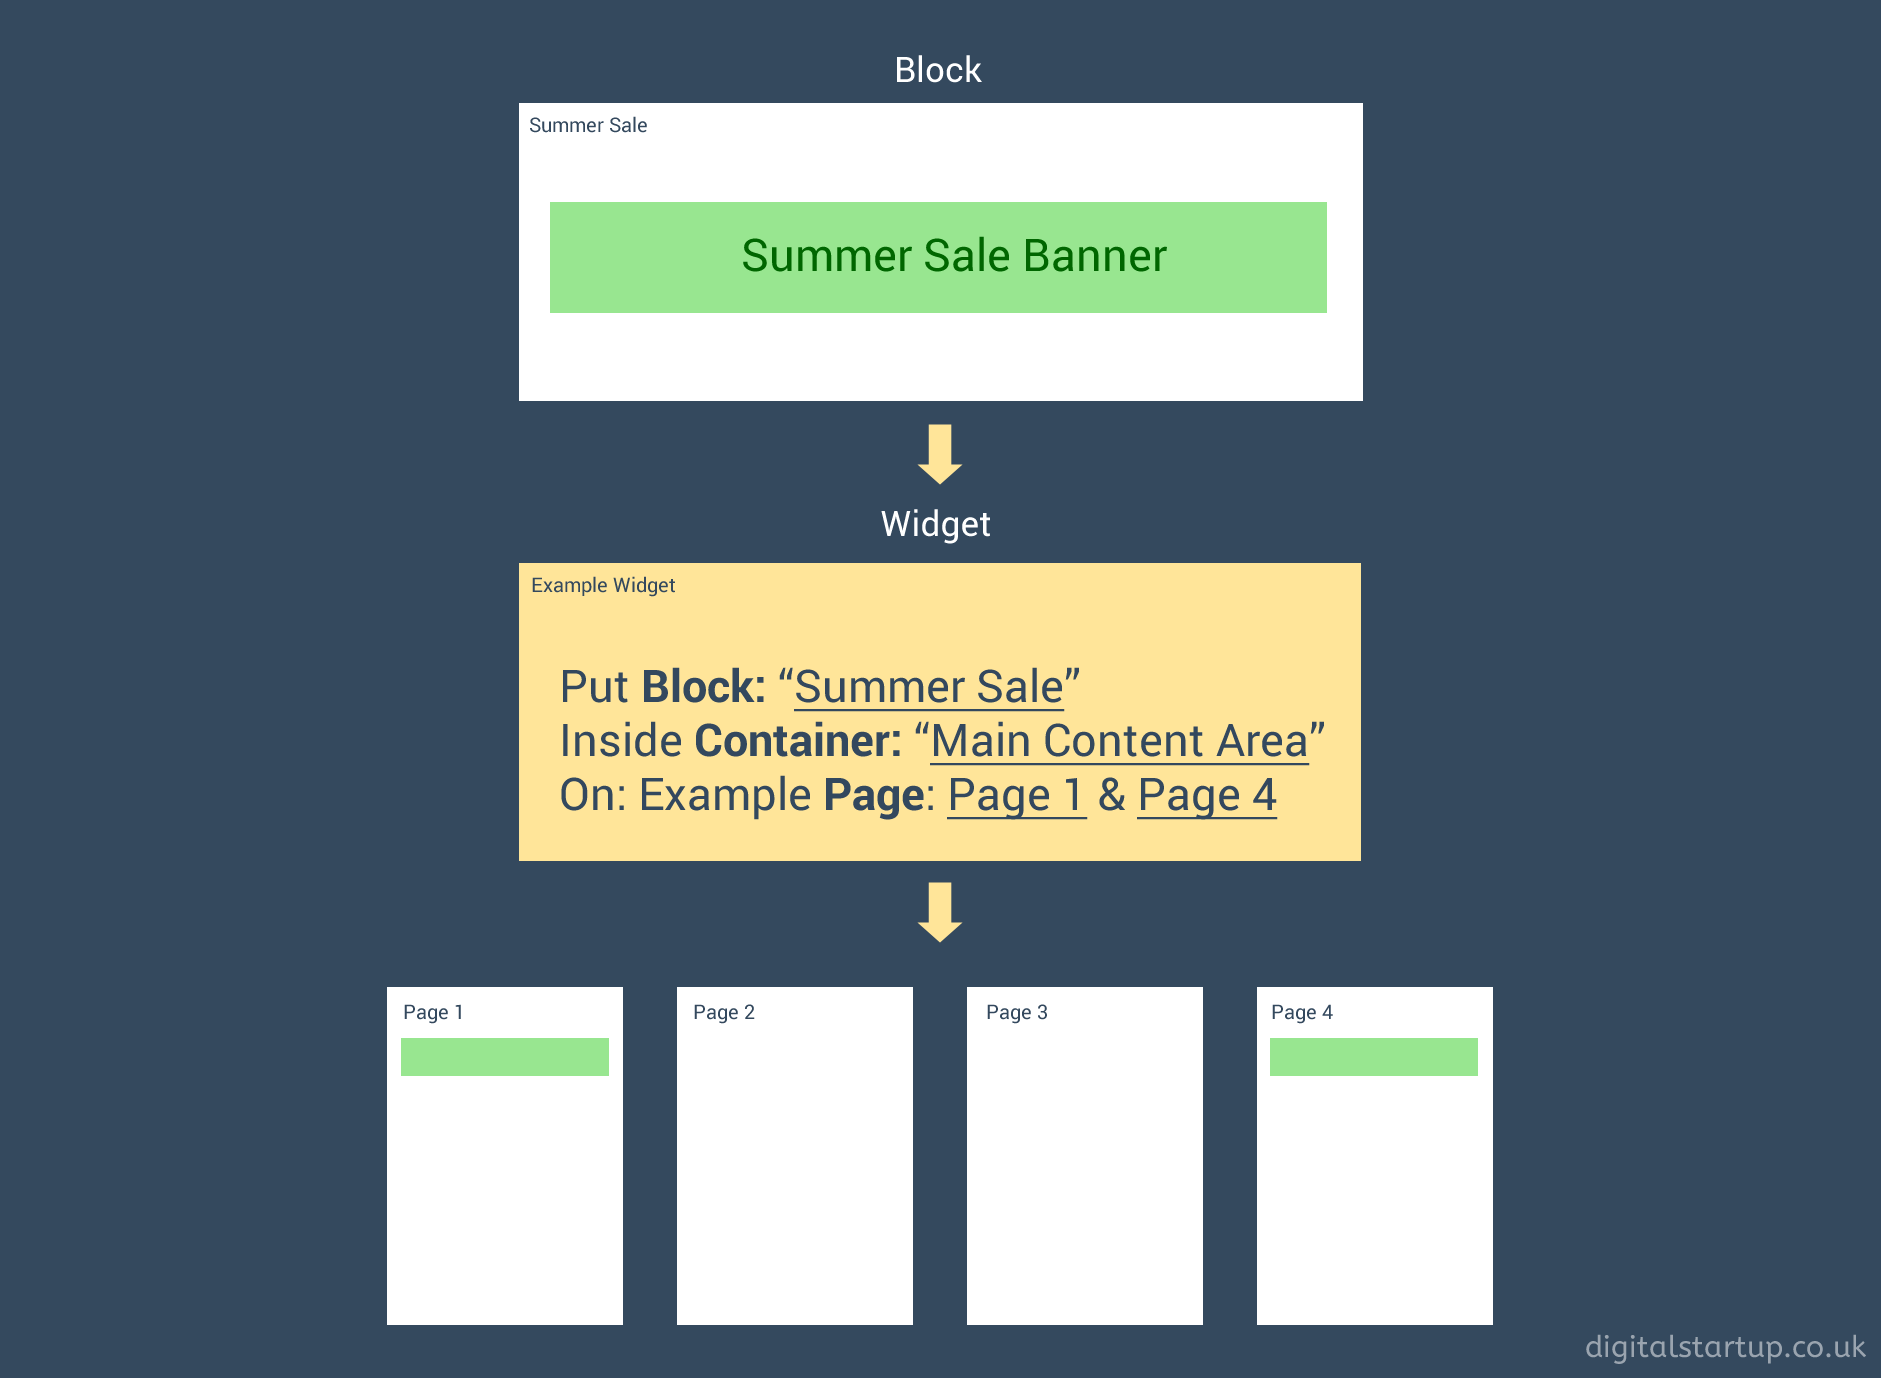
So, say you have a summer sale and you want to put a banner on some of your pages. Rather than go into each page page, you can put the banner in a Block and then tell the Widget which pages to put the banner on and where to do it. This also avoids the issue of taking the banner down at the end of the sale and forgetting to take it off one of the pages.
Widgets also allow you to add content to pages that you can’t edit without coding, such as the Checkout.
Now that I’ve briefly gone over the concept of Page Layouts, Containers, Blocks and Widgets - It should make the remainder of this tutorial go a little smoother.
Back to the Homepage
So, going back to the Homepage we can safely assume that everything above where I wrote “Hello” can be found inside a Block.
We can check this by going into Content > Blocks. A quick scan through the list of Blocks shows one conveniently called “Home Page Block”. Opening this Block will reveal what we see on the Home Page. Therefore, we can make any adjustments we want here. Or we could simply disable that Block so it doesn’t appear at all.
Now let me go into Content > Widgets to show you how the Block was added to the Home Page. In the list of Widgets you’ll find one called “Home Page”. Clicking on this will reveal the following page…
I won’t be going over all of these settings, as that falls outside the scope of this video. But the key areas to pay attention to is the Layout Updates which specify both the Page and the Container that the Widget is displayed on. In this case you’ll see the CMS Home Page and the Main Content Area.
And then under Widget Options, you’ll find the Block being used - Which is the one we were looking at a couple of moments ago.
Category Page
If you’re still with me, then let’s have a look at another example. This time we’ll look at one of the product Categories labeled “Men”, which shares a similar layout to the Home Page. Again, you might assume that the content of this page would be found under Catalog > Categories > Men, inside of the Content area. However, just like the Home Page example it’s empty.
You’re probably one step ahead of my now, but if we go back into Content > Blocks, you’ll see 2 Blocks related to Men named “Men Left Menu Block” and “Men Block”.
As you’d expect, “Men Left Menu Block” shows the HTML being shown in the column and “Men Block” being shown on the main section.
A quick look at Content > Widgets shows that each of these blocks have been placed on the page using 2 individual widgets. Once called “Men’s Left Menu” and the other called “Men Category Content”.
If I open the Widget named “Men’s Left Menu”, you can see under Layout Updates that the Widget is placing the Block on any Anchor Categories, but specifically on Category 11 (which is the Men Category). And this is then being placed inside of Container labelled Sidebar Main. And like before, under Widget Options you’ll see the Block - “Men left Menu Block”.
Conclusion
As you’ve seen, Magento offers several methods that lead to the same output. But each method has its own Pro and its own Con. It’s only really once you’ve been using Magento for a long time you realise the caveat to doing something one way compared to the other. If you’re just starting out using Magento, use whichever method makes more sense to you.
Speaking from experience, you’ll be moving or changing something one day and then something will just “click” - And all the knowledge will just fall into place.