
Introduction
I get quite a lot of people come to me with issues installing Magento 2. More often than not, this comes down to a step that was overlooked during the installation process.
This can be forgiven based of how overwhelming and complicated the process first appears.
One of the consequences from overlooking a step can result in incorrect Ownership or Permissions of the Magento files. This is done by not executing specific commands as the correct user.
It’s an issue that comes up often enough, that I’ve decided to write this post to point people to next time it comes up.
The remainder of this guide assumes that you’ve been following this guide, so the commands and images are tailored to this.
Evaluate your issue
The first step to determine your issue is to list all of the files in your web directory where Magento is installed. The following command will list all Files and Folder (including hidden files):
ls -la /var/www/html/
This will result in an output that looks something like this:
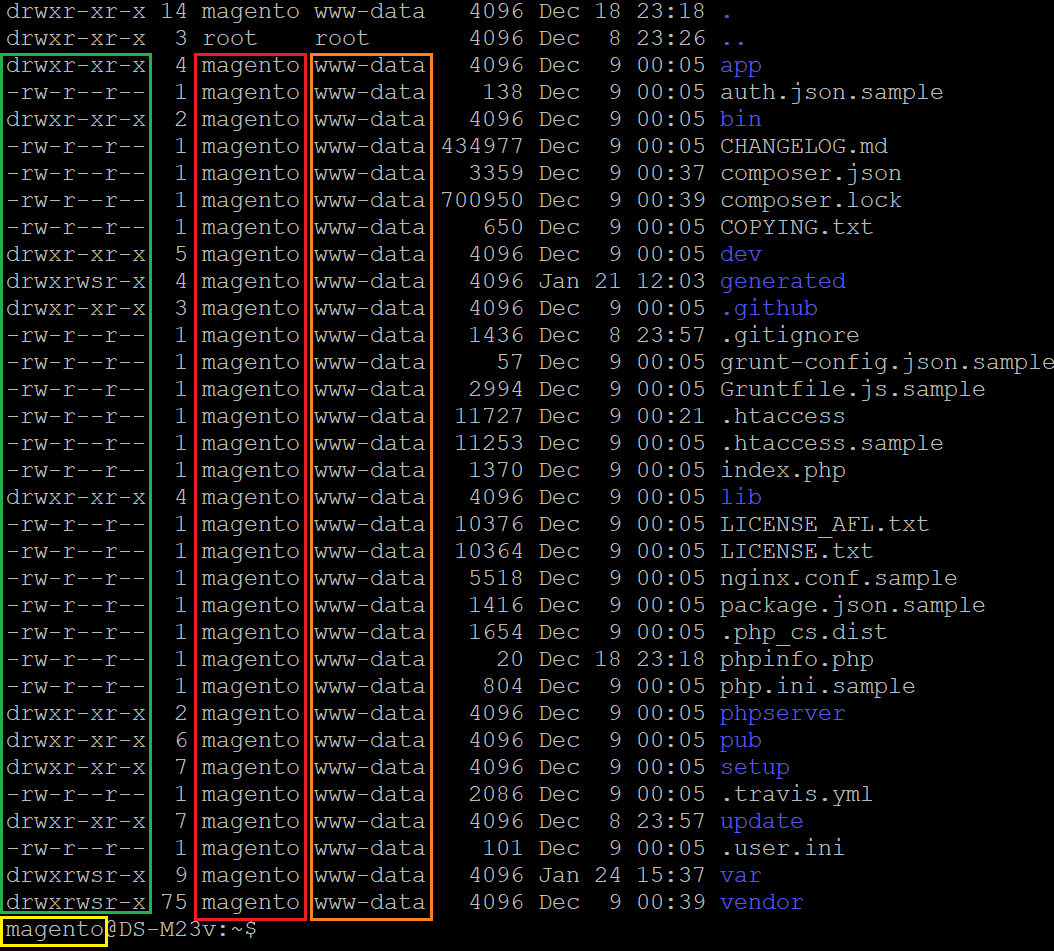
This output tells you 4 very important pieces of information:
- Who owns the File/Folder (RED)
- What group the File/Folder belongs to (ORANGE)
- What Permissions the File/Folder has (GREEN)
- Who you are currently executing commands as (Yellow)
These are the tell-tale signs that your issue is related to Ownerships or Permissions:
- The usernames highlighted in RED and YELLOW do not match (
magento) - The username in ORANGE is not
www-data - Folders** in GREEN are not
drwxr-xr-x - Files** in GREEN are not
-rw-r--r--
**only applicable when listing the root directory.
Fixing the issue(s)
Having now identified that the issue is related to Ownerships or Permissions, you need to run the following commands.
How to fix Ownerships
This command must be run as superuser because you won’t have the permissions to update them if they don’t belong to magento:
sudo chown -R magento:www-data /var/www/html/
How to fix Permissions
Assuming that your Ownerships are correct, you will have the correct permissions to run the following command as magento user from within the /var/www/html/ directory - Which is what I recommend you do:
find var generated vendor pub/static pub/media app/etc -type f -exec chmod g+w {} + && find var generated vendor pub/static pub/media app/etc -type d -exec chmod g+ws {} + && chmod u+x bin/magento
How to fix Cron Tasks
Another common mistake I see are cron tasks being created under the wrong user. So, during the installation process of Magento 2.3 you run a command that sets up cron tasks. To give you an example, if I were to set these cron tasks under the “craig” user rather than the “magento” user then every time a cron tasks was executed then it would either result in:
- An error where “craig” user didn’t have the permissions to change any files
- Or the creation of files as with the “craig” user as the owner, thus creating more issues further on
So, I’ve created a scenario where that is exactly what has happened.
First, I want to check what cron tasks are setup under each user. This is something that’s best done as a superuser. So, once again I’ll switch to the superuser… Now that I’m logged back in I’ll run:
sudo crontab -l -u magento
This will check any cron tasks setup under the “magento” user. As you can see from the results there are no tasks setup under the “magento” user, when there should be.
Next I’ll run the same command without “-u magento” at the end:
crontab -l
This displays the cron tasks for the user I’m logged in as. And as you can see, there are Magento tasks setup that shouldn’t be there.
Now we know the issue for sure. All we have to do is delete the cron tasks from the superuser and install them under magento.
To delete the tasks that I setup under the “craig” user I simply type:
crontab -e
If you’ve never entered this command in before, you’ll be asked what text editor you want to use. Just press “2” to use the nano text editor.
With the file now open, removing the tasks are as simple as holding down the Delete Key… Once finished press Ctrl+X to exit and “Y” and Enter to save.
The final thing to do now is switch back to my magento user by typing
exit
And running the cron installation command to reinstall the cron tasks as the correct user, which is done with:
bin/magento cron:install
Remember, we can verify this is installed under the “magento” user now by running:
crontab -l
Which shows all of the tasks setup under the user that I’m currently logged in as - Which is the “magento” user. And there’s the output we’d expect to see
Final words…
- That concludes the steps to both identify and fix an issue relating to Ownerships or Permissions.
- ALWAYS backup your server before executing any commands - Instructions you read may be incorrect or you may misdiagnose your issue and make things worse.
- For more information on File Access Permissions, read the Official Magento Documentation.
- If you found this guide useful, please hit the heart icon at the bottom to let me know